2、springsecurity-jwt整合
2.1整合springsecurity
1)
<dependency>
            <groupId>org.springframework.boot</groupId>
            <artifactId>spring-boot-starter-security</artifactId>
</dependency>
2.2认证授权流程
认证管理
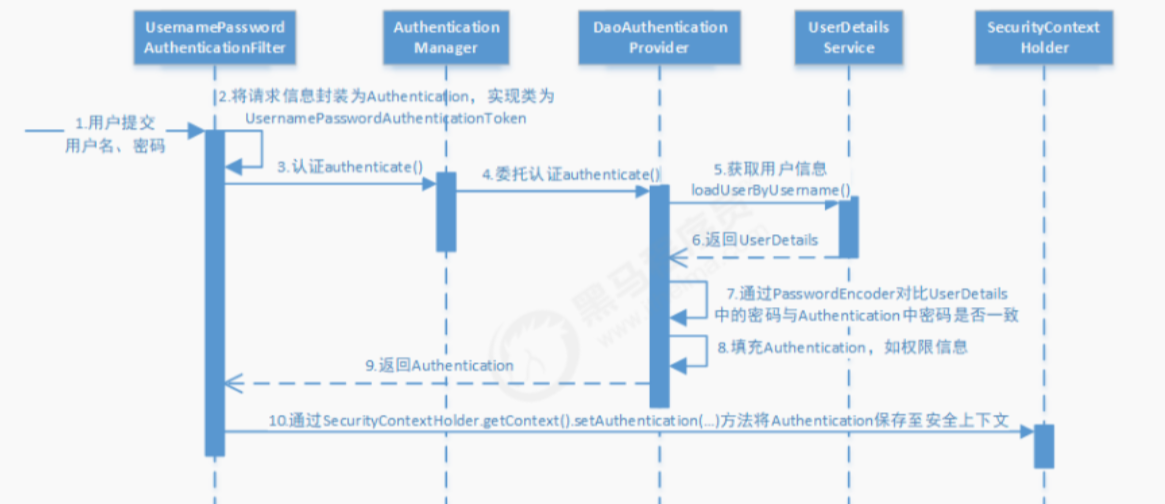
流程图解读:
1、用户提交用户名、密码被SecurityFilterChain中的 UsernamePasswordAuthenticationFilter 过滤器获取到, 封装为请求Authentication,通常情况下是UsernamePasswordAuthenticationToken这个实现类。
2、然后过滤器将Authentication提交至认证管理器(AuthenticationManager)进行认证 。
3、认证成功后, AuthenticationManager 身份管理器返回一个被填充满了信息的(包括上面提到的权限信息, 身份信息,细节信息,但密码通常会被移除) Authentication 实例。
4、SecurityContextHolder 安全上下文容器将第3步填充了信息的 Authentication ,通过 SecurityContextHolder.getContext().setAuthentication(…)方法,设置到其中。 可以看出AuthenticationManager接口(认证管理器)是认证相关的核心接口,也是发起认证的出发点,它 的实现类为ProviderManager。而Spring Security支持多种认证方式,因此ProviderManager维护着一个 List 列表,存放多种认证方式,最终实际的认证工作是由 AuthenticationProvider完成的。咱们知道web表单的对应的AuthenticationProvider实现类为 DaoAuthenticationProvider,它的内部又维护着一个UserDetailsService负责UserDetails的获取。最终 AuthenticationProvider将UserDetails填充至Authentication。
授权管理
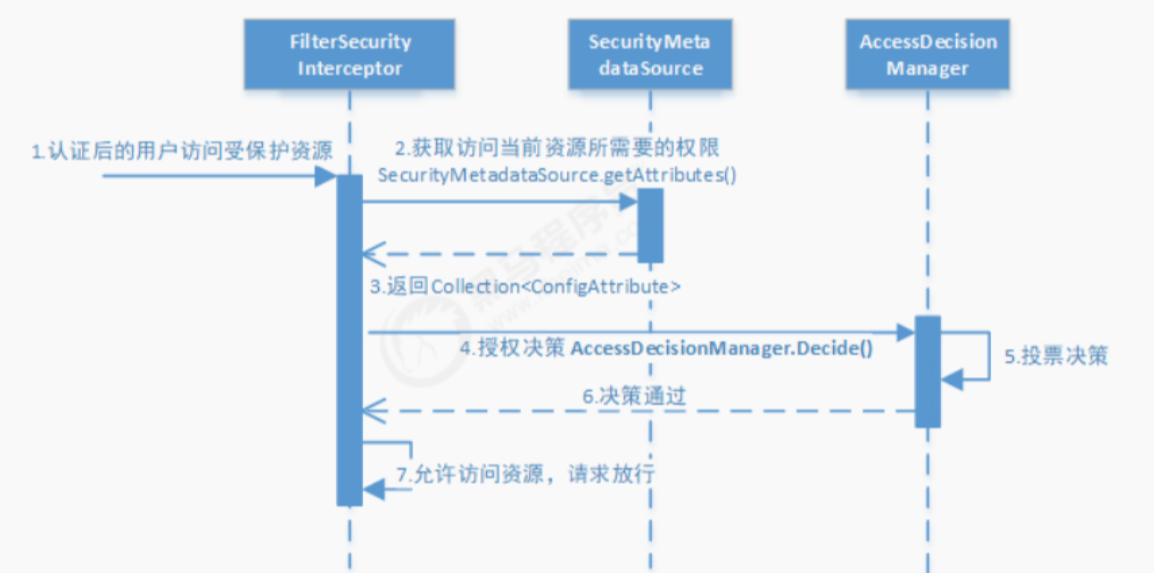
访问资源(即授权管理),访问url时,会通过FilterSecurityInterceptor拦截器拦截,其中会调用SecurityMetadataSource的方法来获取被拦截url所需的全部权限,再调用授权管理器AccessDecisionManager,这个授权管理器会通过spring的全局缓存SecurityContextHolder获取用户的权限信息,还会获取被拦截的url和被拦截url所需的全部权限,然后根据所配的投票策略(有:一票决定,一票否定,少数服从多数等),如果权限足够,则决策通过,返回访问资源,请求放行,否则跳转到403页面、自定义页面。
2.3编写自己的UserDetails和UserDetailService
2.3.1UserDetails
package com.ds.book.entity;

import com.baomidou.mybatisplus.annotation.TableName;
import java.io.Serializable;
import java.util.Collection;

import lombok.Data;
import lombok.EqualsAndHashCode;
import lombok.experimental.Accessors;
import org.springframework.security.core.GrantedAuthority;
import org.springframework.security.core.userdetails.UserDetails;

/**
 * <p>
 *
 * </p>
 *
 * @author java大师
 * @since 2023-03-17
 */
@Data
@EqualsAndHashCode(callSuper = false)
@Accessors(chain = true)
@TableName("t_user")
public class User implements Serializable, UserDetails {

    private static final long serialVersionUID = 1L;

    private Integer id;

    /**
     * 登录名
     */
    private String name;

    /**
     * 用户名
     */
    private String username;

    /**
     * 密码
     */
    private String password;

    /**
     * 是否有效:1-有效;0-无效
     */
    private String status;


    @Override
    public Collection<? extends GrantedAuthority> getAuthorities() {
        return roles
                .stream()
                .map(role -> new SimpleGrantedAuthority(role.getRoleCode()))
                .collect(Collectors.toList());
    }

    @Override
    public boolean isAccountNonExpired() {
        return true;
    }

    @Override
    public boolean isAccountNonLocked() {
        return true;
    }

    @Override
    public boolean isCredentialsNonExpired() {
        return true;
    }

    @Override
    public boolean isEnabled() {
        return true;
    }
}
2.3.2userDetailService
登录成功后,将UserDetails的roles设置到用户中
package com.ds.book.service.impl;

import com.baomidou.mybatisplus.core.conditions.query.QueryWrapper;
import com.ds.book.entity.User;
import com.ds.book.mapper.UserMapper;
import com.ds.book.service.IUserService;
import com.baomidou.mybatisplus.extension.service.impl.ServiceImpl;
import org.apache.commons.lang3.StringUtils;
import org.springframework.beans.factory.annotation.Autowired;
import org.springframework.security.core.userdetails.UserDetails;
import org.springframework.security.core.userdetails.UserDetailsService;
import org.springframework.security.core.userdetails.UsernameNotFoundException;
import org.springframework.stereotype.Service;

/**
 * <p>
 *  服务实现类
 * </p>
 *
 * @author java大师
 * @since 2023-03-17
 */
@Service
public class UserServiceImpl extends ServiceImpl<UserMapper, User> implements IUserService, UserDetailsService {

    @Autowired
    private UserMapper userMapper;

    @Override
    public UserDetails loadUserByUsername(String username) throws UsernameNotFoundException {
        User loginUser = userMapper.selectOne(new QueryWrapper<User>().eq("username", username));
        if (loginUser == null){
            throw new UsernameNotFoundException("用户名或密码错误");
        }
        loginUser.setRoles(userMapper.getRolesByUserId(loginUser.getId()));
        return loginUser;
    }
}
2.3.2加载userDetailService
将我们自己的UserDetailService注入springsecurity
package com.ds.book.config;

import com.ds.book.filter.JwtTokenFilter;
import com.ds.book.service.impl.UserServiceImpl;
import org.springframework.beans.factory.annotation.Autowired;
import org.springframework.context.annotation.Bean;
import org.springframework.context.annotation.Configuration;
import org.springframework.security.config.annotation.ObjectPostProcessor;
import org.springframework.security.config.annotation.authentication.builders.AuthenticationManagerBuilder;
import org.springframework.security.config.annotation.web.builders.HttpSecurity;
import org.springframework.security.config.annotation.web.builders.WebSecurity;
import org.springframework.security.config.annotation.web.configuration.WebSecurityConfigurerAdapter;
import org.springframework.security.config.http.SessionCreationPolicy;
import org.springframework.security.crypto.bcrypt.BCryptPasswordEncoder;
import org.springframework.security.crypto.password.PasswordEncoder;
import org.springframework.security.web.access.intercept.FilterSecurityInterceptor;
import org.springframework.security.web.authentication.UsernamePasswordAuthenticationFilter;

@Configuration
public class SecurityConfig extends WebSecurityConfigurerAdapter {


    @Autowired
    private UserServiceImpl userService;

    @Bean
    public PasswordEncoder passwordEncoder(){
        return new BCryptPasswordEncoder();
    }

    //注入我们自己的UserDetailService
    @Override
    protected void configure(AuthenticationManagerBuilder auth) throws Exception {
        auth.userDetailsService(userService).passwordEncoder(passwordEncoder());
    }
}
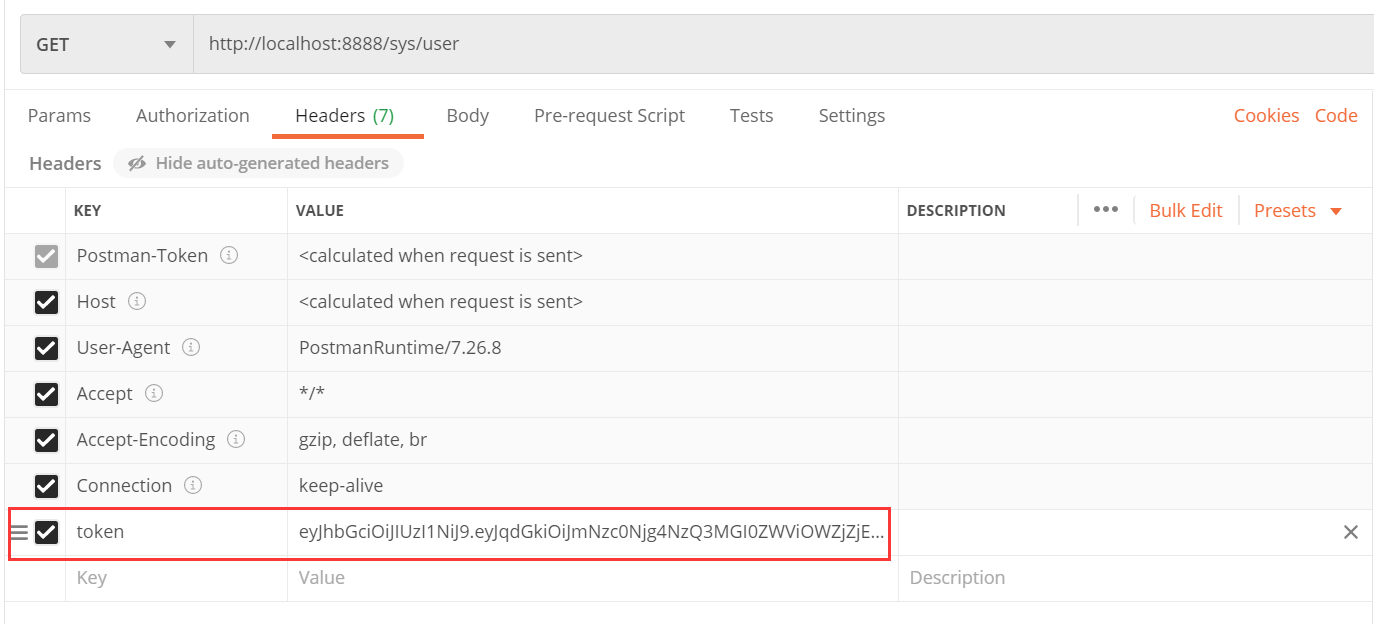
问题:前后端分离项目,通常不会使用springsecurity自带的登录界面,登录界面由前端完成,后台只需要提供响应的服务即可,且目前主流不会采用session去存取用户,后端会返回响应的token,前端访问的时候,会在headers里面带入token.
欢迎转载,转载请标注出处。关注公众号: JAVA大师, 后台回复 资源,既可获取资源链接 !!!